Advanced Setup with Docker
This guide covers detailed configuration, customization, and operational topics for running SpaceDF with Docker Compose.
Use this guide if you need:
- Production-ready configuration
- Security hardening
- Custom ports, domains, or authentication
- Update, maintenance, and removal procedures
If you only want to get SpaceDF running quickly with default settings, see Quick Start.
Contents
Prerequisites
Before setting up SpaceDF, you should be familiar with some basic concepts. You do not need to be an expert, but you should understand:
- Basic Linux server usage (connecting to a server, running commands).
- How Docker and Docker Compose work at a high level.
- Basic networking concepts such as ports and firewalls
Make sure the following tools are installed on your machine or server:
Install Docker based on your operating system:
- Linux server or VPS: Install Docker Engine and Docker Compose
- Linux desktop: Install Docker Desktop
- macOS: Install Docker Desktop
- Windows: Install Docker Desktop
Once these requirements are met, you are ready to start installing SpaceDF.
System requirements
Minimum requirements for running all SpaceDF Platform components, suitable for development and small to medium production workloads:
Resource | Minimum | Recommended |
|---|---|---|
| RAM | 4 GB | 8 GB+ |
| CPU | 2 cores | 4 cores+ |
| Disk | 20 GB available | 80 GB+ SSD |
Installing SpaceDF
Follow the steps below to install and run SpaceDF on your machine.
# Make your new spacedf project directory
mkdir spacedf-project

# Get the code
cd spacedf-project
git clone https://github.com/Space-DF/spacedf-core.git

# Switch to your project directory
cd spacedf-core

# Copy the env vars
cp .env.example .env

# Pull the latest images
docker compose pull
Configuring and securing SpaceDF
The .env.example file includes sample passwords and keys for reference only.
You must replace these values before starting SpaceDF in a self-hosted environment.
Review the configuration options below and make sure all secret values are set before starting SpaceDF.
Security notes
- Do not commit passwords, secrets, or API keys to Git
- Do not expose secret values on the client side (browser)
- If a value is marked as “Keep this value secret”, it must never be shared publicly
- Do not reuse secrets across systems or environments
- Use strong and unique passwords for all services
- Use the minimum required permissions for all credentials
- Rotate keys immediately if they are exposed
- Use HTTPS / WSS in production environments
Configuring Environment Variables
This section explains how to configure the required environment variables in the .env file before starting SpaceDF.
Open the .env file using a text editor (for example: VS Code, Nano, or Notepad).
Services Configuration
These environment variables configure the backend services that power the self-hosted SpaceDF server.
Backend services include APIs, messaging, databases, and integrations required to run the core system.
RabbitMQ credentials
RabbitMQ is used by SpaceDF for background tasks and internal message processing between services.
You can choose any username and password you want, as long as:
- The same values are used by RabbitMQ and all SpaceDF services
- The credentials are defined in the environment variables below
# Replace with your own values.
RABBITMQ_DEFAULT_USER=your_username
RABBITMQ_DEFAULT_PASS=your_passwordRABBITMQ_DEFAULT_USER- The username SpaceDF uses to connect to RabbitMQ.RABBITMQ_DEFAULT_PASS- The password for the RabbitMQ user above.
Do not use simple or common passwords. This account controls access to your message queue.
Keep these credentials safe—you may need them to log in to RabbitMQ for troubleshooting later.
Authentication (JWT)
SpaceDF uses JSON Web Tokens (JWT) to authenticate users and secure API requests.
You must set a private key and a public key before starting SpaceDF.
Recommended: Generate a new key pair
openssl genrsa -out private_key.pem 2048
openssl rsa -in private_key.pem -pubout -out public_key.pemCopy the contents of each file into your .env file:
JWT_PRIVATE_KEY=-----BEGIN RSA PRIVATE KEY-----...
JWT_PUBLIC_KEY=-----BEGIN PUBLIC KEY-----...-
JWT_PRIVATE_KEY- Signs authentication tokens (Keep this key secret.). -
JWT_PUBLIC_KEY- Verifies authentication tokens. This key can be shared with other services if needed.
Make sure the keys are pasted correctly and not broken across lines.
Google OAuth
Google OAuth allows users to sign in to SpaceDF using their Google account.
To enable Google login, you need to create OAuth credentials in the Google Cloud Console and set the values below in your .env file.
How to get Google OAuth credentials
Go to the Google Cloud Console
Create or select a project.
Enable Google Identity Services.
Go to APIs & Services → Credentials.
Create an OAuth 2.0 Client ID:
Application type: Web application
Authorized redirect URI: (GOOGLE_CALLBACK_URL)
This is the callback URL that Google redirects to after a user successfully signs in with Google.
 # Production
 https://your-domain.com/auth/google/callback

 # Development
http://localhost:3000/auth/google/callbackCopy the generated Client ID and Client Secret into your .env file.
# Replace with your own values.
GOOGLE_CALLBACK_URL=https://spacedf.example.com/auth/google/callback
GOOGLE_CLIENT_ID=1234567890-abcxyz.apps.googleusercontent.com #(Step 5)
GOOGLE_CLIENT_SECRET=your_google_client_secret #(Step 5)GOOGLE_CALLBACK_URL- The URL Google redirects users back to after successful login.GOOGLE_CLIENT_ID- Identifies your application to Google.GOOGLE_CLIENT_SECRET- A private key used by SpaceDF to securely communicate with Google (Keep this value secret.)
Use HTTPS for the callback URL in production.
Apple OAuth (Coming Soon)
Apple sign-in support is planned but not yet supported in SpaceDF.
Do not configure these values yet. Apple OAuth is not supported in the current release.
# Apple OAuth (reserved for future use)
APPLE_CLIENT_ID=__APPLE_CLIENT_ID__
APPLE_CLIENT_SECRET=__APPLE_CLIENT_SECRET__
APPLE_CLIENT_KEY=__APPLE_CLIENT_KEY__
APPLE_CERTIFICATE_KEY=__APPLE_CERTIFICATE_KEY__
Auth Service
The Auth Service is responsible for user authentication, authorization, and tenant management in SpaceDF.
Set the following values in your .env file.
# Replace with your own values.
AUTH_POSTGRES_PASSWORD=__AUTH_POSTGRES_PASSWORD__
AUTH_SECRET_KEY=__AUTH_SECRET_KEY__
DEFAULT_TENANT_HOST=__DEFAULT_TENANT_HOST__
ROOT_API_KEY=__ROOT_API_KEY__AUTH_POSTGRES_PASSWORD- The password used by the Auth Service to connect to its PostgreSQL database. (Use a strong and unique password.)AUTH_SECRET_KEY- A secret key used to sign and validate authentication-related data. (Keep this value private.)DEFAULT_TENANT_HOST- The default domain or host assigned to the initial tenant. This is usually your main application domain.ROOT_API_KEY- A master API key with full access to the Auth Service. Used for administrative or internal operations only.
Secret keys: Generate secure random values for secret keys:
openssl rand -hex 32Use the generated value for:
AUTH_SECRET_KEY=generated_secret_value
ROOT_API_KEY=generated_root_api_key
Default tenant host
Set this to the domain or host where SpaceDF will be accessed:
DEFAULT_TENANT_HOST=app.spacedf.exampleS3 Service
The Amazon S3 service is used by SpaceDF to store files such as uploads, assets, and generated data.
SpaceDF supports Amazon S3 only for file storage in this setup.
SpaceDF connects to Amazon S3 using IAM credentials that you provide in the .env file. All file operations (upload, read, delete) are handled internally by SpaceDF services.
End users do not need AWS accounts or credentials.
If you do not already have an AWS account, create one at, see more :
https://signin.aws.amazon.com/signup?request_type=register
After creating your account, sign in to the AWS Management Console to continue with the steps below.
Create an S3 bucket
Open the Amazon S3 Console
Create a new bucket
Choose:
A unique bucket name -> will be used for AWS_STORAGE_BUCKET_NAME
An AWS region close to your server → will be used for AWS_REGION
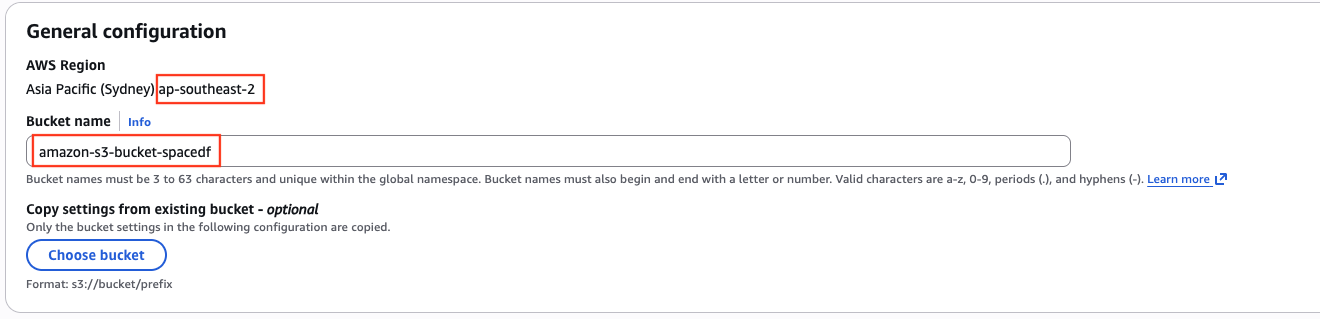
Save the bucket name and region for later use.
Read more: AWS documentation
Create IAM credentials
Open the AWS IAM Console
Create a new IAM user
Grant the user access to the S3 bucket
Recommended: grant only required S3 permissions (read/write)
Create an Access Key for the user
Access Key ID, Secret Access Key
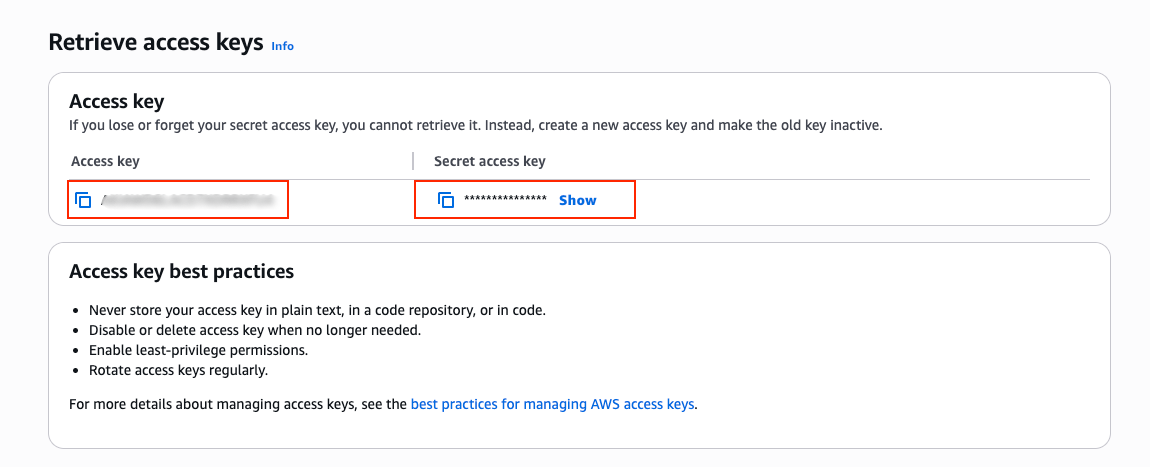
Read more: AWS documentation
Use IAM policies with minimum required permissions.
Set values in .env
    # Replace with your own values.
    AWS_ACCESS_KEY_ID=AKIAXXXXXXXX
    AWS_SECRET_ACCESS_KEY=XXXXXXXXXXXXXXXX

    AWS_STORAGE_BUCKET_NAME=spacedf-storage
AWS_REGION=ap-southeast-1AWS_ACCESS_KEY_ID- The access key used by SpaceDF to authenticate with S3.AWS_SECRET_ACCESS_KEY- The secret key paired with the access key above. (Keep this value private)AWS_STORAGE_BUCKET_NAME- The name of the S3 bucket where SpaceDF stores files.AWS_REGION- The AWS region where the S3 bucket is located. (e.g.,us-east-1,ap-southeast-1).
Redis
Redis is used by SpaceDF for caching and fast data access.
Set the Redis connection URL in the .env file.
# Replace with your own values.
REDIS_HOST="redis://redis:6379/1"redis://— Connection protocolredis— Redis service name (default in Docker)6379— Default Redis port/1— Redis database number
When you do NOT need to change this:
- You are using the provided Docker setup
- Redis is running as part of the included Docker Compose file
When you SHOULD change this:
- Redis runs on a different server or host
- Redis uses a non-default port
- You want to use a different Redis database
Dashboard Service
The Dashboard Service provides the web interface for managing SpaceDF, including administration and monitoring features.
Database password
Choose a strong password for the Dashboard Service database:
# Replace with your own values.
DASHBOARD_POSTGRES_PASSWORD=change_this_to_a_secure_password
DASHBOARD_POSTGRES_PASSWORD - The password used by the Dashboard Service to connect to its PostgreSQL database. (Use a strong and unique password.)
Secret key: Generate a secure random value:
openssl rand -hex 32Set it in your .env file:
# Replace with your own values.
DASHBOARD_SECRET_KEY=generated_secret_value
DASHBOARD_SECRET_KEY - A secret key used to sign and protect dashboard-related sessions and data. (Keep this value private.)
Device Service
The Device Service manages devices, device data, and communication with telemetry-related services in SpaceDF.
Database password
Choose a strong password for the Device Service database:
# Replace with your own values.
DEVICE_POSTGRES_PASSWORD=change_this_to_a_secure_password
DEVICE_POSTGRES_PASSWORD - The password used by the Device Service to connect to its PostgreSQL database. (Use a strong and unique password.)
Secret key: Generate a secure random value:
openssl rand -hex 32Set it in your .env file:
# Replace with your own values.
DEVICE_SECRET_KEY=generated_secret_value
DEVICE_SECRET_KEY - A secret key used to sign and protect device-related data and requests. (Keep this value private.)
Telemetry service URL
Defines the internal Docker service address that SpaceDF uses to communicate with the Telemetry Service.
When using the default Docker setup, the Telemetry Service runs as a Docker container and is accessible via its service name.
# Default (recommended)
TELEMETRY_SERVICE_URL=http://telemetry-service:8080- This value is the same for both local and production deployments when using Docker Compose.
- The Telemetry Service runs from a Docker image and is exposed internally.
- You do not need to change this value in most cases.
Only change this value if you modify the Telemetry Service name or port in docker-compose.yml.
EMQX Service
EMQX is the MQTT broker used by SpaceDF to handle device messaging and real-time communication.
Choose a username and a strong password:
# Replace with your own values.
EMQX_HOST=http://emqx:18083/api/v5
EMQX_USERNAME=spacedf
EMQX_PASSWORD=change_this_to_a_secure_passwordEMQX_HOST- The base URL of the EMQX Management API used by SpaceDF. This is typically the EMQX service running inside Docker.EMQX_USERNAME- The username SpaceDF uses to authenticate with the EMQX broker.EMQX_PASSWORD- The password for the EMQX user above. (Use a strong and unique password.)
Broker Bridge Service
The Broker Bridge Service connects SpaceDF to an external MQTT broker or bridges messages between brokers.
Broker credentials
# Replace with your own values.
MQTT_BROKER_BRIDGE_USERNAME=bridge-user
MQTT_BROKER_BRIDGE_PASSWORD=change_this_to_a_secure_passwordMQTT_BROKER_BRIDGE_USERNAME- The username used to authenticate with the external MQTT broker.MQTT_BROKER_BRIDGE_PASSWORD- The password for the broker bridge user. (Keep this value private.)
MQTT topics
Specify one or more topics, separated by commas.
# Replace with your own values.
MQTT_TOPICS=device/+/telemetry,device/+/status
MQTT_TOPICS - A list of MQTT topics that SpaceDF subscribes to or bridges.
AWS to access to SES service
SpaceDF uses email services to send system emails such as account verification, password resets, and notifications.
This setup commonly uses AWS Simple Email Service (SES), but can be adapted to other SMTP-compatible providers.
How to get AWS SES credentials
Sign in to the AWS Console
Open Simple Email Service (SES).
Verify your domain or sender email address.
Create SMTP credentials in SES:
These are different from your AWS access keys.
Copy the SMTP username and password into:
EMAIL_HOST_USEREMAIL_HOST_PASSWORD
Set the following values in your .env file.
# Replace with your own values.
EMAIL_HOST_USER=AKIAXXXXXXXX
EMAIL_HOST_PASSWORD=XXXXXXXXXXXXXXXX
DEFAULT_FROM_EMAIL=no-reply@spacedf.exampleEMAIL_HOST_USER- The SMTP username generated by AWS SES.EMAIL_HOST_PASSWORD- The SMTP password generated by AWS SES (Keep this value secret)DEFAULT_FROM_EMAIL- The sender email address shown to users.
MPA Service
The MPA Service connects SpaceDF to an MQTT broker to receive and publish messages for application-level processing.
Example: MQTT broker running in Docker
# Replace with your own values.
MQTT_BROKER=emqxl
MQTT_PORT=1883
MQTT_USERNAME=mpa
MQTT_PASSWORD=change_this_to_a_secure_password
MQTT_CLIENT_ID=spacedf-mpa
MQTT_TOPIC=devices/+/eventsMQTT_BROKER- The hostname or IP address of the MQTT broker.MQTT_USERNAME- The username used to authenticate with the MQTT broker.MQTT_PASSWORD- The password for the MQTT user. (Keep this value private.)MQTT_PORT- The port used to connect to the MQTT broker (e.g.,1883for plain TCP,8883for TLS).MQTT_CLIENT_ID- A unique client identifier for the MPA Service when connecting to MQTT.MQTT_TOPIC- The MQTT topic the MPA Service subscribes to.
Use TLS (8883) in production if available
Restrict broker permissions to required topics only
Bootstrap Service
The Bootstrap Service is the backend service responsible for initial system setup and cross-service coordination when SpaceDF starts.
This service runs inside Docker as the SpaceDF backend.
Service host
This value defines the base URL where the Bootstrap (Backend) service is accessible.
# Local development (default)
HOST=http://localhost:8000
For production deployments, set this to your public API domain:
# Replace with your public API domain.
HOST=https://api.spacedf.example
HOST - The public base URL where the Bootstrap Service is accessible. This is used by other services to communicate with it.
If you change the backend port, make sure to update:
- HOST in your
.envfile - The backend port in
docker-compose.yml
CORS origins
List all frontend origins that should be allowed to access the service. Separate multiple values with commas.
Development (local)
# Local development (default)
CORS_ALLOWED_ORIGINS=http://localhost,http://localhost:3000,http://localhost:3001
Production
# Replace with your own values.
CORS_ALLOWED_ORIGINS=https://app.spacedf.example,https://admin.spacedf.example
CORS_ALLOWED_ORIGINS - A comma-separated list of allowed origins for cross-origin requests. This controls which frontend domains can access the Bootstrap Service.
Important notes
- Controls which frontend domains can access the Bootstrap service
- Each frontend must be listed explicitly, including protocol and port
- If you change frontend ports in
docker-compose.yml, update both the Docker ports andCORS_ALLOWED_ORIGINS
Example:
If the Dashboard is moved from port 3000 to 4000, you must add:
http://localhost:4000to CORS_ALLOWED_ORIGINS.
Secret key: Generate a secure random value:
openssl rand -hex 32Set it in your .env file:
# Replace with your own values.
BOOTSTRAP_SECRET_KEY=generated_secret_value
BOOTSTRAP_SECRET_KEY - A secret key used to secure internal Bootstrap operations. (Keep this value private.)
Organization Initialization
These settings are used to create the initial organization and owner account when SpaceDF starts for the first time. This step runs only during the first startup.
# Replace with your own values.
ORG_NAME=SpaceDF
ORG_SLUG=spacedf
OWNER_EMAIL=admin@spacedf.example
OWNER_PASSWORD=change_this_to_a_secure_passwordORG_NAME- The display name of your organization.ORG_SLUG- A short, URL-friendly identifier for the organization (lowercase, no spaces).OWNER_EMAIL- The email address of the initial organization owner.OWNER_PASSWORD- The password for the owner account. (Use a strong and secure password.)
🎉 You have now finished configuring the backend services.
Next, continue with the frontend (web app) configuration.
Admin Portal Configuration
The Admin Portal is used for system-level and organization-level administration.
This application is typically accessed by platform administrators, not end users.
Configure these environment variables to connect the Admin Portal to backend services and authentication providers.
Before continuing
Make sure you have completed the Backend Services Configuration above.
The Admin Portal depends on backend authentication and API services.
Authentication
Generate NextAuth secret
Open the following link in your browser to generate a secure random secret:
Copy the generated value and set it in your .env file:
# Replace with your own values.
PORTAL_NEXTAUTH_SECRET=4f7c2a9e8d1b6c3f0a...
PORTAL_NEXTAUTH_SECRET - A secret key used by NextAuth to encrypt sessions and tokens. (Keep this value private.)
Admin Portal URL
Development
HOST_FRONTEND_ADMIN=http://localhost:3001
PORTAL_NEXTAUTH_URL=http://localhost:3001
Production
HOST_FRONTEND_ADMIN=https://admin.spacedf.example
PORTAL_NEXTAUTH_URL=https://admin.spacedf.exampleHOST_FRONTEND_ADMIN- The public URL where the Admin Portal is accessible.PORTAL_NEXTAUTH_URL- The base URL used by NextAuth for redirects and callbacks.
This value should match the Admin Portal public URL.
API Access
Using Docker
PORTAL_AUTH_API=http://haproxy:3000External API
# Replace with your own values.
PORTAL_AUTH_API=https://api.spacedf.example
PORTAL_AUTH_API - The backend API endpoint used by the Admin Portal for authentication.
This typically points to the internal API gateway or load balancer.
References
Use the official documentation below if you need more details about NextAuth behavior or advanced configuration:
Dashboard Configuration
This section configures the SpaceDF Dashboard, the main web interface used for daily operations, device monitoring, and data visualization.
Before continuing
Make sure you have completed the Backend Services Configuration above.
The Dashboard depends on backend APIs, MQTT, and authentication services.
Authentication
Generate NextAuth secret
Open the following link in your browser to generate a secure random secret:
Copy the generated value and set it in your .env file:
# Replace with random secret.
DASHBOARD_NEXTAUTH_SECRET=4f7c2a9e8d1b6c3f0a...

# The public URL where the Dashboard is accessible.
DASHBOARD_NEXTAUTH_URL=http://localhost:3000DASHBOARD_NEXTAUTH_SECRET- A secret key used by NextAuth to encrypt sessions and tokens. (Keep this value private.)DASHBOARD_NEXTAUTH_URL- The public URL where the Dashboard is accessible.
This value is used for redirects and callbacks.
API Access
Using Docker
DASHBOARD_AUTH_API=http://haproxy:3000External API
# Replace with your own values.
DASHBOARD_AUTH_API=https://api.spacedf.example
Map Services
The Dashboard uses MapTiler as a map service to resolve location names from coordinates and support location-based features.
How to get a MapTiler API key
Create a MapTiler account: MapTiler
Go to your dashboard and create an API key.
Copy the key and set it as MAPTILER_API_KEY.
# Replace with your API Key.
MAPTILER_API_KEY=__MAPTILER_API_KEY__
MQTT (Real-time Data)
The Dashboard connects to MQTT to receive real-time device data.
Recommended values
Development
DASHBOARD_MQTT_PROTOCOL=ws
DASHBOARD_MQTT_PORT=8883
DASHBOARD_MQTT_BROKER=emqx.localhost:8000
Production
# Use wss (secure WebSocket) in production.
DASHBOARD_MQTT_PROTOCOL=wss
DASHBOARD_MQTT_PORT=443
DASHBOARD_MQTT_BROKER=emqx.example.comDASHBOARD_MQTT_USERNAME/DASHBOARD_MQTT_PASSWORD- Credentials used by the Dashboard to connect to the MQTT broker.DASHBOARD_MQTT_PROTOCOL- Protocol used for MQTT connections.
Use ws (WebSocket) for browser-based clients.DASHBOARD_MQTT_PORT- Port exposed by the MQTT broker for WebSocket connections.DASHBOARD_MQTT_BROKER- Host and port of the MQTT broker accessible from the browser.
Use HTTPS and wss in production environments
Restrict MQTT permissions to read-only topics for the Dashboard
References
Starting and Stopping
This section explains how to start, check, and stop SpaceDF services using Docker Compose.
Starting the services
From the directory that contains your ./entrypoint.sh file, run:
# Start all services in the background
chmod +x entrypoint.sh
./entrypoint.sh
Docker will start all SpaceDF services in detached mode.
Checking service status
After starting, you can check the status of all services:
docker compose psWithin a minute, most services should show a status similar to:
Up (healthy)Troubleshooting startup issues
If a service shows a status like created or does not become Up, check its logs to see what went wrong.
For example, to view logs for a specific service:
docker compose logs analyticsReview the logs for errors such as missing environment variables or connection issues.
Stopping the services
To stop all running SpaceDF services, run:
docker compose downThis stops and removes the containers but keeps your data volumes intact.
Notes
- Starting and stopping services may take a short time
- Always check service status after starting
- Stop services before making configuration changes
Accessing SpaceDF Services
After all services are running, you can access SpaceDF through the web interfaces and backend APIs using the URLs below.
Service | Port |
|---|---|
| Dashboard | localhost:3000 |
| Admin Portal | localhost:3001 |
| Backend API | localhost:8000 |
| EMQX (API) | localhost:18083 |
| MQTT (WebSocket) | localhost:8883 |
Notes
- Make sure all services show Up (healthy) before accessing them
- Use HTTPS in production environments
- Ensure firewall and reverse proxy settings allow access to the required ports
Updating
SpaceDF publishes stable updates for the Docker Compose setup on a regular basis. To update your self-hosted deployment, pull the latest changes from the repository and restart the services.
Updating services requires restarting containers and may cause temporary downtime.
General update process
Pull the latest changes from the SpaceDF repository.
Pull updated Docker images.
Restart the services.
In most cases, this is enough to apply the latest updates.
Updating individual services (advanced)
You can run a specific version of a service by changing its Docker image tag in the docker-compose.yml file.
Running mixed versions of services is not guaranteed to be compatible.
This approach is recommended only if you know exactly what you are doing.
Update or rollback a single service
For example, if you want to update or roll back the Dashboard service:
Check available images and tags on the SpaceDF container registry .
Choose a version tag (for example: v2026.01.21).
Update the image field in docker-compose.yml
image: ghcr.io/space-df/spacedf-web-app:v2026.01.21Apply the changes:
 docker compose pull
 docker compose down
 docker compose up -d
The service will restart using the specified version.
Notes on downtime
- Services must be restarted to apply updates
- Active users may experience brief downtime
- Consider performing updates during low-traffic periods
Staying up to date
- To track changes, fixes, and new features, refer to:
- SpaceDF release notes
- The self-hosting changelog in the repository
Uninstalling
Warning
The steps below will permanently delete all SpaceDF data, including databases and storage volumes.
Make sure you have backups before continuing.
Stop and remove services
From the directory that contains your docker-compose.yml file, run:
# Stop all services and remove containers and volumes
docker compose down -v
This command stops all SpaceDF services and removes all associated Docker volumes.
(Optional) Remove remaining data manually
In some cases, you may want to ensure all data directories are fully removed.
Remove database data
rm -rf volumes/db/dataRemove storage data
rm -rf volumes/storageWhat gets removed
- All SpaceDF services
- All databases and stored data
- All uploaded files and assets
After these steps, SpaceDF is completely removed from your system.
Notes
- These actions cannot be undone
- Use this only if you want a clean uninstall
- For reinstallation, follow the setup guide from the beginning
Demo
Need Help?
- Community Forum - Get help from the SpaceDF community
- Discord Server - Real-time chat with other users and developers
- Documentation - Comprehensive guides and tutorials
- Professional Support - Enterprise support with SLA guarantees
Ready to start? Create your SpaceDF account and begin tracking your devices in minutes!